How to Chip Glass: Instructions
This is an ever growing list of links which attempt to explain the basics:
![]()
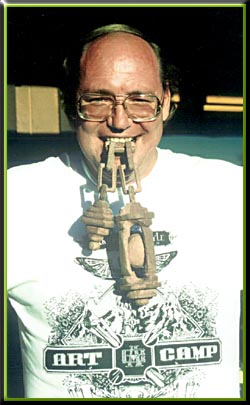
Rick Glawson: Instructions & Comments:
Glue Chipping Glass has been around for many years. Most of the original Letterheads learned the process from Bob Mitchell while he was in Aspen, CO. Rick learned the process, then took it even farther and fine tuned some of the variables.
He researched the old processes used by Rawson and Evans in Chicago around the turn of the century. He re-established the asphaltum assisted chipping methods many use today. The steps below give the basics of glue chipping.
Rick Glawson’s Glue Chipping Formulas and Techniques (Rediscovered & adopted by Rick Glawson)
An improved method of ornamental glass chipping developed by the Rawson & Evans Company of Chicago in the 1890’s. This method is time saving and allows multiple techniques without the need of remasking or recutting as well as intricate selective chipping with a bare minimum of overchipping.
Although this tech sheet is basic, it will guide you through the steps for optimum results. The only materials change from the original patents is the use of modern sandblast resist instead of lead foil. Remember that this is a natural process and to quote an old saying, “A dog only knows how to be a good unless he’s sick”. We have used & taught this method for many years and I’m sure you will find it both a rewarding & profitable endeavor.
STEP ONE (mixing the glue) NOTE: Only one type of glue will work for this process. It is a low grade, dry, animal hide glue with an approximate 165 gram strength and designated as glass chipping glue. High strength hide cabinet glues or gilder rabbit skin glues are very elastic and will not work. Neither do white or yellow wood working glues.
Using a 3 oz. Dixie cup as a gauge, take 1 cup of dry glue with 1½ cups of cool tap water for every approximate square foot of area to be chipped. Mix these together in your glue pot and cover with a plate or scrap of glass to prevent water evaporation. Allow to soak at least 30 minutes before any heat is applied. A double boiler works fine, but you will soon tire of the thermometer mess and upgrade to an electric glue pot. It’s important that the glue temperature does not go above 160 degrees or else the glue becomes cooked, rendering it useless. An electric pot has a built in rheostat to maintain the correct heat. The water to glue ratio of 1 1/2 to 1 is sufficient for most selective chipping. Remember that the more water you add, the more that has to evaporate before it can chip. Using less water in the mix (1 to 1) slows the glue flow and gels rapidly. This can cause difficulty in achieving an even glue layer, yet is invaluable when brush applying multiple thin coats to curved or cylindrical objects such as neon tubes or jars. On the other hand, when large solid areas are to be chipped (say 4 sq ft or larger) you want the gelling slowed down to level out evenly. Here we will use as much as a 2 to 1 ratio. It can take several hours to gel, but as long as you have the glass panel perfectly level, the glue thickness will be consistent
STEP TWO (preparing the glass) Virtually any type of glass can be chipped in any thickness with the popular choice being ¼” thick annealed plate. Double strength (1/8”) is fine for smaller projects but single strength window glass (1/16”) should be avoided in any size over a square foot. If you attempt to chip large areas on thin glass, you risk cracking the panel during the glue’s contracting phase. ¼” or thicker will eliminate any chances of disaster. Clean the working side of your panel with Bon-Ami or soap and water to remove all dirt and cutting oils. Windex type sprays are fine for this step as only general cleanliness is required. The use of a short wave ultraviolet light to determine the good (uncontaminated) side of the glass is only recommended if you plan on chemically applying gold or silver to the piece. With your panel cleaned and dry, apply asphaltum varnish in an even thin layer to your working side. If only border work or center work is desired you need only cover those areas. A short nap paint roller is ideal and when finished, submerge in a can of water. As long as the roller remains under water, the asphaltum will never dry. (Before the next use, just drain and roll off ALL moisture and you’re ready to go). After 10 minutes or so or when the varnish film feels dry to the touch, apply your sandblast resist or vinyl to the surface. DO NOT use application fluid. Apply dry avoiding air bubbles as best as possible. Intermediate 4 mil vinyl is sufficient as you are only going to frost the glass. Our favorite is 3M Scotchcal Plus #3470. It is very elastic, economical, 4 to 5 mil in thickness and is great for both light carving and frosting. It plotter cuts well but only comes unpunched. After squeegeing well, pounce on your design and lightly spray with clear lacquer to fix it. Knife cut the image and weed out the resist. Those with plotter capability can just transfer your premasked vinyl as normal.
STEP THREE (sandblasting) All that is required at this step is a light frost, just enough to remove the shine from the surface. The asphaltum layer will disintegrate on contact with the abrasive spray. A cheap syphon sandblaster will work but this is slow and not as preferable as a pressurized system. If you don’t blast in-house, a local art glass studio will usually accommodate you. Avoid large sandblasting services which descale metal or blast wood because their pressure is too high and the abrasive size too coarse. Silica sand in the 100 to 120 grit range is adequate with 120 or finer grade preferred in the more expensive aluminum oxide or silicon carbide. After blasting, blow off any loose dust on the surface. Do not wipe it off and avoid touching the abraded surface lest you contaminate it with finger oils.
STEP FOUR (leveling & glue application) If you HAVEN’T already, plug in your glue pot or turn a low fire on your double boiler. I might mention that you can use a microwave oven to heat the glue as long as you give it short bursts and don’t bubble it out of the container. Whichever method is used, at the point where it is soupy with no remaining lumps when it is stirred, it’s ready to go. Technically, the glue mix is optimum when it has been taken between 140 and 145 degrees for 5 minutes. This lines up the protein chain and delivers it full strength and is referred to as prepared gelatin. Any time span beyond this preparation only requires heating to a flow able state. Place the glass panel on a comfortable working bench and strip off the sandblast resist, taking care not to disturb the varnish film at the perimeter of each frosted area. If the asphaltum readily peels off the glass along with the mask, then either the glass was not clean or water moisture was involved during its application. Just touch up any voids with a brush. Now, using a bubble level and some wood wedges or ice cream sticks, level the piece as accurately as possible. This will insure an even glue thickness and obviously the larger the open areas to be chipped, the more critical the leveling. Going to the glue pot, stir one final time and fill up the squeeze bottle. You can wrap a shop or paper towel around it as it is usually hot to handle and place the cover back on the pot. Squeeze the glue into the open areas as lava would flow. The harder you squeeze, the more material flows onto the surface. With a little practice you can easily trace the flow to the outer edges as well as filling in the center voids. Notice that the glue will self level to a perfect desired thickness or approximately 1/16”. The asphaltum acts as a chemical dam rather than a physical one, as water and oil DOESN’T mix. This repels the glue at the edges and eliminates moisture from creeping under a mask, causing a ragged chip. For the time being, don’t worry about any glue flowing beyond the edges as this can be easily trimmed off once it gels. When finished, return any leftover glue to the pot and thoroughly wash out the bottle and while still filled with water, replace the nozzle and flush it. Any glue remaining in your pot can be transferred to a sealed plastic container and refrigerated until its next use. Even months later, it need only be warmed to a flowing state for use.
STEP FIVE (drying and cleaning) If you wish, place a fan blowing gently over your piece to aid in its drying. When the glue has reached a cello-like state, trim off any excess that has flowed beyond the image with a wooden wedge or razor blade. Any asphaltum trimmed off at this point is unimportant now. Allow the glue to dry to a tough hard stage. If you live in a dry climate, the glue will not only dry rapidly on its own but go through the entire chipping stage without further help. For the majority of us who have humidity levels over 50%, alternate action is required. Once thoroughly dry, the piece can be exposed to the hot sun, warming up the surface and driving off the moisture. This works relatively well providing the sun stays bright without cloud cover. We have found without fail, rain or shine, that the use of a drying heat box is the best. You will find a diagram of its construction at the end of these notes. The optimum humidity is 35% or below. Between 35% and 50%, chipping will occur although slowly. If the glue layer is too thin, it won’t be strong enough to chip. This is usually evident by the glue surface having a rough texture, as coated sandpaper. Remedy this by wiping over the surface with a water dampened paper towel and (by brush or nozzle) reapplying a fresh thin coat of glue. If some areas of glue are too thick, then they will take much longer to chip. If a thick area still refuses to budge, soak it in water to swell and remove the glue. Then, taking care not to contaminate the frosted surface, paint an outline of the asphaltum around the unchipped area and reapply some fresh glue. . The reason for this outline is to contain the glue and prevent a double chipped area. During the normal chipping process, there occurs a desire on our part to help the glue along by picking at the pieces to knock them loose. This can cause over chipping at the edges and should be avoided. Tapping at an unchipped area with an X-acto knife can satisfy this need as well as giving the glue a fresh fracture to work with. When the process is completed, remove the panel to a flat surface and soak in water (wet newspapers will do) to soften and swell any remaining glue, allowing it to be washed away. The remaining asphaltum can now be easily and quickly removed with paint thinner or naphtha. Wash off the residue with soap and water and dry.
ADDITIONAL NOTES When chipping large solid areas or complete sheets of glass, we have grooved plastic rollers available which act as spreaders, leaving the correct thickness of glue on the surface. Double chipping is accomplished by a second application of glue after the first one is completed. This second layer attaches itself to the sandblasted ferns remaining, tearing these out and resulting in a nugget appearance. Oceania has a wavy look and of having large sections ripped out and is usually reserved for divider panels. When your glue film has gone beyond the gelled stage and yet retains a damp cement feel, carefully place a sheet of heavy bond or butcher paper onto the surface. If pieces of paper overlap one another, tear the underlying edge ragged to avoid straight lines from appearing in the finished work. The drying time can be a little longer, but as a result, the layer of stuck paper will curl up from side to side giving an ocean appearance. At times you may have simple bold designs and choose not to use the asphaltum. In these cases, after you have masked, weeded and blasted the piece, level as usual and apply your glue. Once it has reached the gel state, trace around the design with an X-acto knife and strip off the mask. (Thanks to John Jordan for supplying this document to this site, and also to Kimberly Zanetti for retyping the old document for use here!)
![]()
Bob Mitchell: Instructions & Comments:
The following instructions are simplified for use as a reference and we recommend the book “The Art of Glue Chipped Glass Signs” by Bob Mitchell, published by Signcraft Magazine.
With your glass masked off and the image to be chipped, cut out and weeded, lightly sandblast with a fine grit (100 to 220 grit is the best range). Level the glass on a bench inside the shop and dam the edges with tape if you plan on chipping the greater portion of the glass surface.
For each one sq.ft. of area to be chipped, measure by weight 1 ½ oz. of dry glue and 3 oz. of water by volume. Mix together in an electric glue pot and cover. Let stand for approx. 30 minutes until the glue has swelled (like oatmeal). At this point, plug in the glue pot until the mixture is heated and runny like soup (approx. 30 minutes). You may also use a double boiler or a microwave oven (in 1 minute bursts) until pourable. Apply a layer of glue onto the glass 1/16″ thick overlapping the image. Let it set until the glue cools to the consistency of jello.
Now cut around the image with an x-acto knife and strip off the stencil along with the excess glue. Let the glue dry. A fan lightly blowing will speed up the process. If your humidity is above 45%, the glue will not proceed past the first hard stage. In order to chip glass, the humidity must be below 45%. If you live in a dry climate, this will not concern you. If not you can proceed by putting the project in the sun or on a light box. In very humid areas, an enclosed box with a dehumidifier or heat lamps will do the trick. The main concern is to not let the temperature rise above 150° or you will cook the glue rendering it useless. Do not apply the heat until the glue has completely dried and is transparent.
Allow the glue to chip completely. Small stubborn areas may be chipped off with a razor blade or x-acto knife. Before gilding or silvering, soak the image with water to swell and remove any tiny bits of glue. As a reminder, there are a wide range of animal hide glues manufactured of which most are too strong to effect a constant chip. Most problems arise from using the wrong glue which is why we recommend the 5X grade which we also carry in stock and use ourselves.
![]()
Milligan & Higgins : Technical Sheet
Div. of HUDSON INDUSTRIES CORP. 100 Maple Ave., Johnstown, New York 12095-0506 USA Telephone: 518-762-4638, Facsimile: 518-762-7039 e-mail: milligan@superior.net, http://www.milligan1868.com Product Bulletin DIRECTIONS FOR PREPARATION AND USE OF GLASS CHIPPING GLUE
- You will need: Etched or sandblasted glass to be chipped. The class should be thoroughly clean and grease-free
- Clean glue pot, or double boiler
- Stirring stick
- Thermometer
- Masking tape
- Level working surface
- Drying area held at about 100 degrees F.
Measure the glass surface to be chipped and determine the area in square feet. You will need about ½ c. of glue solution for each square foot of glass. The glass should be about room temperature, or slightly warmer, to permit the glue to spread as needed before it gels. With masking or similar type tape, (and being careful not to get any grease or dirt on the glass), frame the area to be chipped. The tape will contain the glue in the area to be chipped. In a clean, electric glue pot or double boiler, add 1 part glue to 2 parts water. Stir a little and allow the mixture to soak for about an hour. Heat the mixture, stirring occasionally until it reaches 140 degrees F. (If the glue is too hot, it may crack the glass as it is poured.) Pour the liquid glue onto the glass and tilt as necessary to distribute the glue to the taped boundaries. The film of glue now should be about 1/16 inch thick. Allow the glass to rest and cool on a level surface for a few hours, or until a fingernail pressed into the edge of the glue makes a slight dent. Now, the chipping may be accelerated by placing the glass in a warm, but not hot (100 degrees F), drying area until it has finished chipping. CAUTION: glue chips contain very sharp glass! Do not remove them with bare hands. A clean paint brush works well.
![]()
Pat Mackle’s Chip Against Etch:
On the panels, the line around the chipping was etched deep. This helped control the chip line.
This was the sequence.
Do stencil process and sand blast. Strip and clean the glass.
Apply clear contact. (Contact paper was better then than it is nowadays)
Use deep etched outline to trace cut and remove Contact from areas to be chipped.
Use squeegee to float glue over entire pattern area.
After glue gels, place the panel in refrigerator to further chill the glue. Cut and roll excess glue off Contact covered areas (like Teflon) using X-acto and return this gelled glue back to glue pot to be used again (saved a lot of glue and time this way).
Any glue that creeped under the Contact I learned to ignore as it wouldn’t chip because it couldn’t dry. The second chip was done the same, squeegeeing another application of glue over the existing Contact paper and so on.
![]()
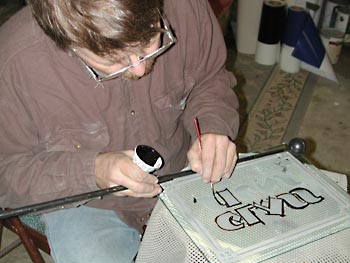
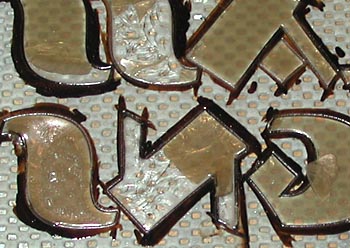
Mike Jackson’s Chip Against Glass:
I tried Pat Mackle’s version of chipping right to the edge of an etched line. On the second try, I got it to work, but while I was doing it, I also tried a slightly different version using asphaltum to protect the outlines. The steps below illustrate my alternate method.
After all the deep etch lines were blasted into the glass, I frosted the face of the letters. Then, I removed the blast stencil that surrounded the lettering. The decorative border had glue chip areas which wouldn’t touch etched lines, so I left the stencil on those areas and did the “standard” chip method. Using a #0 Mack Quill, I outlined the areas I wanted to protect—the deep etched outlines—with asphaltum. It takes a little skill with the brush, but you only have to be careful on one side. Any asphaltum that gets on the frosted face of the letter can be easily removed with a Q-Tip and laquer thinner.
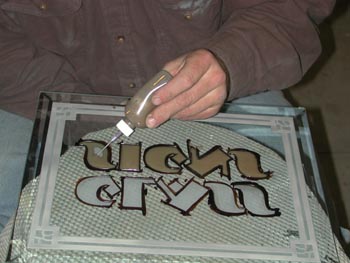
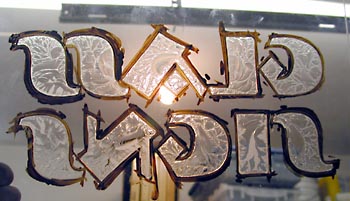
After preparing and heating the glue as normal, I poured the glue in a small squirt bottle with a metal nozzle and squirted it on the raised lettering (the lightly frosted areas). You need to use “some” care, but if a little glue gets in the asphaltum areas, you can easily peel it off once it gels. The glue will not grip to the asphaltum, but I think it is safer to remove excess.
It only took about 10 minutes to dome the glue onto all the lettering and all the borders. I waited until the glue gelled to the normal consistency and then cut along the edges of the stencil on the border design. After the cuts were made, I removed the remaining border stencil. The glue for this technique must be a little thinner in viscosity to go through the nozzle. As a result, I know I have to dome the glue even thicker than if it had been regular consistency.
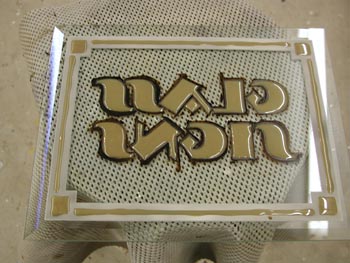
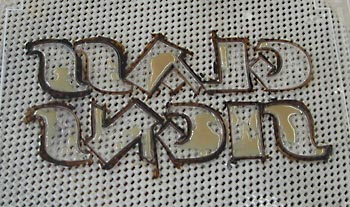
One of the “advantages” of this asphaltum process is knowing you don’t have to be around at the exact moment to peel or cut remaining glue or stencil away from the chip areas (although, I did have to do that in this case because of the border technique). The piece was simply put in a warm room and overnight it began to chip. I live in the Rocky Mountains and we have very low humidity. By the next morning, it was beginning to chip, so I moved it to my lighted drafting table to let the heat from the balasts and lights quicken the chipping pace.
By later in the day, my project had fully chipped, however I had a few frosted areas as you can see in the “I”.
I made an “executive” decision and squirted a little more glue in the problem areas. Looking back, I would have simply recoated the entire face of the lettering. It wouldn’t have taken any longer and my chip would have been a full “double chip”.
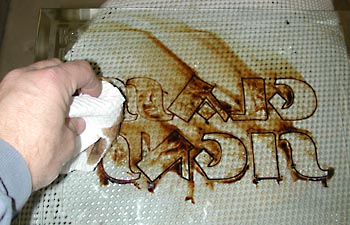
Once all the glue had chipped, I squirted a little bit of laquer thinner on the panel and wiped it up with a paper towel. It took surprisingly little thinner and only two paper towels to clean the glass. I then rinsed the glass and lightly scrubbed it with some Bon-Ami and later with Windex
Here’s a close-up of the final piece.
![]()
Glue Ratings:
The glue used for chipping glass is generally called animal hide glue. Many companies sell animal hide glue, but to get the best results, you must use glue that has been formulated and tested. Milligan & Higgins produces a product they call #10 GCG (Glue Ghip Glue) rated at 164 Gram Strength.Milligan & Higgins rate the strength of their glue into 15 different grades.
![]()
Glue Sources:
Glue manufactured by Milligan & Higgins can be purchased in 50 lb drums directly from the company in New York or Pearson Sales on the West Coast. Additionally, smaller quantities can be purchased from a variety of companies listed below.
Milligan & Higgins – Glue Chip Glue
Maple Avenue – P.O. Box 506 – Johnstown, NY 12095 Phone: 518-762-4638 – Fax: 518-762-7039.
On the West Coast:
Pearson Sales Co Inc (626) 851-8129
5268 Rivergrade Rd – Irwindale, CA.Smaller quantities available from these sources:
Ed Hoy’s International
27625 Diehl Rd.
Warrenville, IL 60555
Tel: 630-836-1353/Fax: 630-836-1362
GCG#10 (Glass Chipping)Wood Finish Supply
P.O. Box 929
Fort Bragg, CA 95437
Email: wfs@woodfinishsupply.com
Tel: 800-245-5611/Fax: 707-962-9484
192, 222, Rabbit Skin and GCG#10 -Glass Chipping
Letterhead Sign Supply
2570 Bodega ave. Petaluma, Ca. 94952
800-531-3359 – 707-769-0129 – Fax 707-769-0292Etchmaster
Glue Chip Glue at about $7/lb or $28/5lb